Showing posts with label vegan. Show all posts

Thursday, April 15, 2021

Green Monster Smoothies For Weight Loss

 Green Monster Smoothies For Weight Loss


Green Smoothie Recipe

This green smoothie is a simple, healthy and nutrient-dense recipe that will fuel your mornings! From apples to spinach to bananas, these wholesome ingredients are a great way to sneak more greens into your everyday routine. Trust me, this is one drink you’re going to want to make again and again.

Green smoothie recipe in a glass.

You’ve probably come across many healthy green smoothie recipes in your lifetime. But do you find that you’re extremely hungry right after – or that it lacks in flavor? Well, after doing lots of testing, I can definitely say I’ve created the perfect green smoothie.

So it’s time to ditch store-bought smoothies and blend your own right at home! Chances are, this one’s way more delicious and well-rounded with the right nutrients.

Green Smoothie Recipe Video


Tips For A Healthy Smoothie

If you haven’t read my post on how to make the healthiest green smoothie, make sure to do that. But here’s a few quick tips:

  • Add more greens: If you want that boost in vitamins, minerals, and nutrients, use fresh produce from the market or your local farmer’s market. You don’t want wilted or dirty greens that lack in nutrients. A few leafy greens that blend well are kale, spinach, or chard. But, feel free to switch it up with celery, mustard greens, or romaine!
  • Stick with a healthy liquid base: Since you’ll already be adding fruit into your smoothie, it’s best to not add any additional sugars with fruit juice. Instead, opt for water, coconut milk, or any nut milks such as almond milk or cashew milk.
  • Mix up your fruits: For most people, 2:1 ratio between fruits and vegetables is a good rule of thumb. Some of my favorite fruits to slice and freeze are apples, bananas, strawberries, mangos, or pineapple.
  • Don’t forget about healthy fats: If you didn’t know, healthy fats help absorb all the nutrients from the veggies and fruits – so this is crucial! You can do this simply by adding coconut oil, nuts, seeds, or 1/4 of an avocado.
  • Boost with superfoods: While the 4 steps above make a perfectly good green smoothie, it doesn’t hurt to add additional superfoods or mix-ins, like I do on my post-workout green smoothie recipe. You can add spices such as cinnamon or ginger and superfoods like maca powder or bee pollen.


Green Smoothie Ingredients

While the the ingredient list is extremely flexible, here’s one of my favorite combinations that’s simple yet so delicious:

  • Milk– 1 1/2 cup of milk, or any nut milk
  • Spinach– 2 cups fully packed
  • Banana– 1 banana (frozen is best)
  • Apple– 1 apple sliced into pieces
  • Avocado– 1/4 avocado

Close up view of green smoothie recipe.

How To Make The Best Green Smoothie

Just toss the above ingredients into a high-powered blender and blend for about 30 seconds. That’s it! By the end of it, you’ll have a deliciously creamy and vibrant smoothie.

Smoothie Tips

  • If you like your smoothies a bit thicker, add another 1/4 slice of avocado. If you like your smoothies a bit thinner or you’d like to save a few calories, you can substitute the milk with water.
  • Don’t add ice cubes as it will dilute the smoothie. The best way to keep the smoothie cold is to use a frozen banana.


More Easy Smoothie Recipes

If you’re on the hunt for more smoothie ideas to throw into your weekly rotation, here are a few of my favorites:


Wednesday, April 14, 2021

Vegan Pho Soup

 Vegan Pho - Vietnamese Soup


Vegan pho Soup

Prep 30 min
Cook 1 hr 10 min
Serves 6

For the broth
1 white onion, peeled, topped and tailed, to create flat surfaces for the griddle
2 large thumbs ginger, peeled and halved lengthways
½ daikon, peeled
3.5 litres water
1kg mixed root veg (carrot, swede, turnip, celeriac, parsnip)
250g mushrooms (chestnut, oyster or shiitake)
1 fennel bulb
2 celery sticks
½ tsp sugar
25g salt
20 star anise
1 small cinnamon stick
2 cloves
1 tsp coriander seeds
1 tsp fennel seeds
Vegetable oil, for frying 120g block firm tofu, sliced into thick, short batons
75g dry flat rice noodles per person

To garnish
Black pepper
Bird’s eye chillies, finely sliced
Spring onions, thinly sliced
1 shallot, peeled and thinly sliced
A handful of coriander, roughly chopped
16-20 enoki mushrooms
Green leaves (pak choi, chard, cress, spinach)

Char the whole onion, ginger and daikon on a griddle. Boil the water in a large pot. Add the charred veg, root veg, mushrooms, fennel and celery. Add the sugar, salt and spices, cover with a lid and simmer for 20 minutes.

Remove and set aside the mushrooms, then simmer the broth for 40 minutes. Remove and reserve the remaining vegetables from the pot.

Meanwhile, fry the tofu in hot oil for five minutes on each side, until golden brown, then drain on kitchen paper.

To serve, cook the noodles according to packet instructions, drain thoroughly, then portion into bowls and season with black pepper and chilli slices. Top with the tofu, sliced stock veg, spring onion, shallot, coriander, enoki and leaves. Ladle over the hot broth, submerging everything. Serve at once with more of the garnishes.


Follow The Master Vegan For More Great Vegan Recipes:


Original recipe: https://www.theguardian.com/lifeandstyle/2018/mar/14/six-of-the-best-pho-recipes

Sunday, February 14, 2021

3 Easy Vegan Pasta Sauces

 These 5 delicious easy Vegan pasta sauces make cooking vegan super easy! Healthy, Vegan and packed with nutrients, we found the best vegan sauces from our favorite sources.


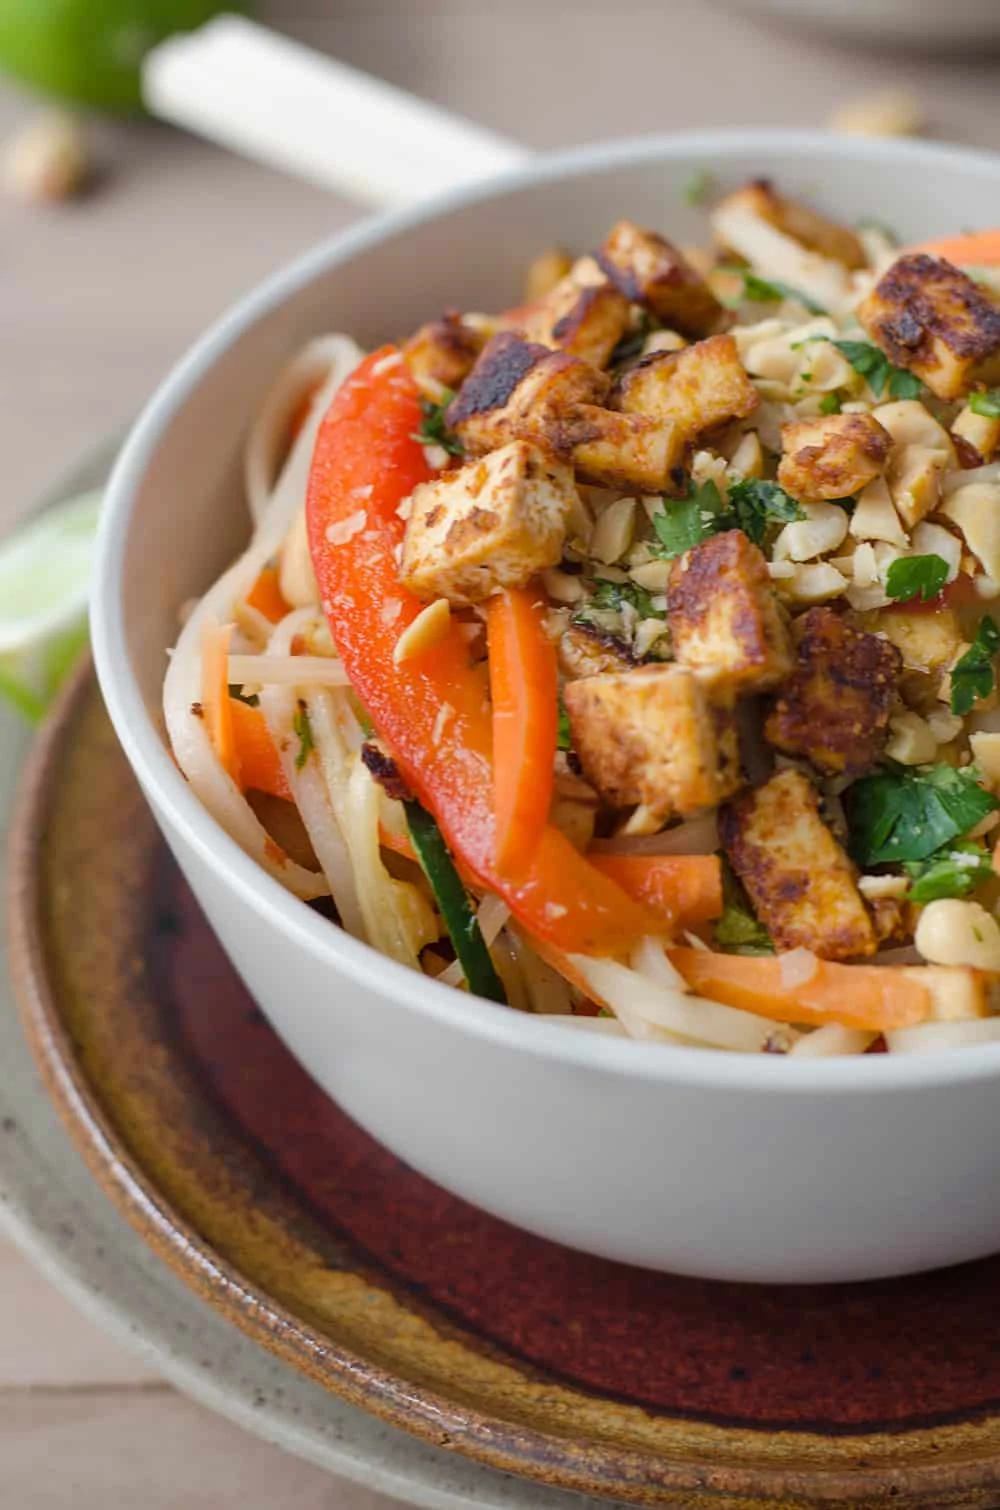
Vegan Pad Thai


My two loves in one dish: pasta and thai food. This one is so delicious, especially with crispy, spicy tofu on top. PS- If you’re looking for the secret to perfectly crisp tofu without a ton of oil, this is it. 

The sauce for the tofu and pad thai is fairly similar, so pull out all of the ingredients to whip them up at the same time. I rely on these glass cups for almost all of my sauces. I measure everything directly into the cups, give a quick whisk and then set aside while I prep the rest of the ingredients. When I’m ready to use them, I can easily pour them into the skillet.

The spicy tofu on top really brings the entire dish together, but if spicy food doesn’t agree with you, feel free to omit the Sriracha all together or reduce the amount.

Spicy Vegan Pad Thai! Spicy pad thai with Sriracha tofu crumbles. Vegan and Gluten Free | www.delishknowledge.com


These recipes brought to you by  #delishknowledge . I absolutely love her creations. Happy cooking! 


Spicy Tofu Crumbles

  • 1 pound extra-firm tofu, sliced 1/2″ thick
  • 1 tablespoon peanut butter
  • 3 tablespoons soy sauce (or tamari for gluten-free version)
  • 12 tablespoons Sriracha (or other hot sauce/paste)
  • 2 tablespoons plain rice vinegar
  • 2 teaspoons toasted sesame oil
  • 2 teaspoons freshly grated ginger

Pad Thai

  • 8 ounces brown rice noodles (or rice noodles)
  • 2 teaspoons oil, divided (I used coconut oil)
  • 1 red pepper, thinly sliced
  • 1/2 white onion, thinly sliced
  • 2 carrots, thinly sliced
  • 1 Thai chili, finely chopped
  • 1/2 cup peanuts, chopped
  • 1/2 cup cilantro, finely chopped

Spicy Pad Thai Sauce:

  • 3 tablespoons soy sauce (or tamari for gluten-free version)
  • 3 tablespoons fresh lime juice
  • 1 tablespoon Sriracha (or other spicy sauce, less if you don’t want as much heat)
  • 3 tablespoons brown sugar
  • 3 tablespoons vegetable broth
  • 1 teaspoon garlic-chili paste
  • 2 garlic cloves, minced

Instructions

  1. Place the uncooked noodles in a bowl of cold water to soak.
  2. Make the Tofu: Arrange slices in a single layer on a paper towel lined plate and cover with a few more paper towels. Press down firmly on tofu with your hands to get rid of any excess liquid.
  3. Heat a large non-stick or cast-iron pan over medium heat. Add the tofu, in a single layer, and cook, turning once until lightly browned on each side, about 5-7 minutes.
  4. Remove from oven and finely chop.
  5. Whisk together the ingredients for the tofu crumbles: peanut butter, soy sauce, Sriracha, rice vinegar, toasted sesame oil and ginger. Pour over the tofu crumbles and let marinate while you prepare the rest of the ingredients.
  6. Make the Pad Thai: Whisk together the ingredients for the Pad Thai sauce and set aside.
  7. Heat a large skillet or wok over medium heat and add 1 teaspoon of oil. Add in the vegetables (red pepper, onion, carrots and chili) and cook until just tender, about 2-3 minutes.
  8. Transfer to a dish and set aside.
  9. Add the remaining teaspoon of oil to the pan and add the drained noodles (they should be soft by now) and stir fry for a minute, stirring often.
  10. Add in the sauce and stir-fry for another minute or two until the sauce starts to thicken and stick to the noodles. Add the vegetables and stir together until just combined. Stir in the peanuts, cilantro and divide among 4 bowls.

  11. otesAdd the marinated tofu crumbles to the skillet and stir fry for another 2-3 minutes until tofu is crispy and sauce is absorbed into the tofu. Divide among the 4 bowls and serve immediately.

For gluten-free version, substitute Tamari for soy sauce


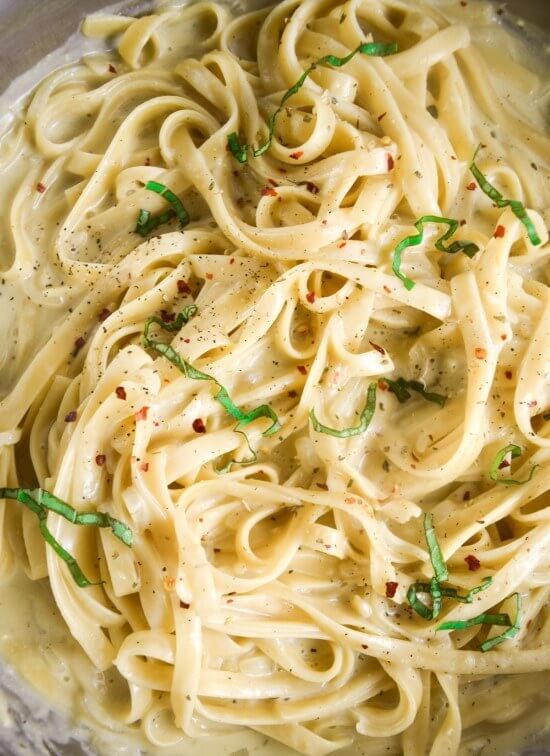
ONE POT CREAMY GARLIC PASTA


This one pot creamy garlic pasta is probably the closest recipe I’ll share to a vegan fettuccine alfredo*. Also, sorry in advance for a couple more pictures than usual today. (Now with a recipe video!)

Close-up of creamy vegan fettuccine noodles in the pan, sprinkled with slivered basil, red pepper flakes, and ground black pepper.


The classic fettuccine alfredo recipe is made with fresh cooked pasta tossed in butter and cheese. The butter and cheese melt together to form a sauce. But nowadays in my neck of the woods, as American takes on dishes are wont to do, our version has managed to evolve to also have the additions of heavy cream, garlic, and more. Regardless, my vegan version has none of those things; but I’d say it’s closer to the bastardized American dish than the authentic original.

The one pot creamy garlic pasta recipe I have here is what I personally find to be an ideal preparation for a creamy vegan pasta dish. Because of the one pan method that cooks together the pasta and the sauce all in one pot, the sauce coats the pasta exceptionally well. Fettuccine is especially suited to coming out to a lovely al dente texture in the final product. Thankfully, if you prefer your pasta cooked differently it’s also easy to adjust.


One Pot Creamy Garlic Pasta

Vegan one pot creamy garlic pasta to meet all of your fettuccine alfredo needs with none of the extra dishes.
 Course Italian
 Cuisine nut-free, vegan, vegetarian
 Keyword one pot creamy pasta, vegan creamy garlic pasta, vegan fettuccine alfredo
 Prep Time 5 minutes
 Cook Time 30 minutes
 Total Time 35 minutes
 Total Yield 3 servings
 Calories Per Serving 362 kcal
 Author Yup, it's Vegan

Ingredients


  • 1/2 tbsp olive oil
  • 4 cloves garlic minced
  • 1 shallot finely chopped
  • 2 cups low-sodium vegetable broth (see notes)
  • 1 and 1/2 cups plain, unsweetened non-dairy milk (see notes)
  • 1 tsp salt plus more to taste (reduce if using a salty broth - mine is low-sodium)
  • 8 oz dry fettuccine
  • black pepper, dried oregano and red pepper flakes to taste
  • chopped fresh basil or parsley for serving

Instructions

  1. Heat the olive oil in a large skillet over medium heat. If possible, choose a skillet that is wide enough to completely fit the fettuccine. Smaller pans will work, but require a bit more fuss to stir and submerge the pasta as it cooks.
  2. Add the garlic and shallot to the pan along with a sprinkle of salt, and stir. Cook for about 2 minutes, stirring occasionally, or until the garlic is softened and the shallot is turning translucent; avoid browning.
  3. Add the vegetable broth, nondairy milk, and salt, and stir. Add the dry pasta and gently prod it around to submerge it under the liquid. If not all of it fits now, you will need to gently push it into the pan after the submerged portion has softened later.
  4. Bring to a boil, then reduce to a simmer. Stir occasionally, gently separating any pasta that starts to stick together. Cook for about 20 minutes, or until the sauce has thickened onto the pasta and the texture is to your liking. If too much of the liquid is cooking off, reduce the heat a little bit, and add more nondairy milk.
  5. Adjust seasoning to taste, and serve with fresh herbs and other toppings if desired. Best served immediately, but leftovers will keep for 3-5 days in the fridge (cool completely to room temperature before boxing up and refrigerating).


20 minute vegan pasta

  • AUTHOR: ALEX CASPERO

20-minute dinner. You are going to love this healthy, easy vegan pasta


Ingredients


3 shallots, chopped

  • 2 garlic cloves, minced
  • 1/4 teaspoon red pepper flakes
  • 8 ounces spinach leaves
  • 8 ounce linguine
  • 1/4 cup vegan parmesan cheese (I use my homemade version to keep in the freezer)
  1. Bring a large pot of salted water to a boil.
  2. Heat the oil in a large skillet over medium heat. Add the shallots and cook until soft and caramelized, about 5 minutes. Stir in the garlic, red pepper flakes and pinch salt/pepper.
  3. Add in the spinach and cook until wilted.
  4. Meanwhile, add the pasta to the salted water and cook a little more than half of the recommended time. For instance, if al dente is 10 minutes, cook for 6.
  5. Add the slightly uncooked pasta to the skillet along with 2 ladles of pasta water. The pasta water has starches to help the sauce cling to the pasta, so don’t substitute regular water. Bring to a simmer and cook, stirring often, until the water has evaporated. Continue to add more pasta water, one ladle at a time (might only need 1-2 more) until pasta is al dente/cooked through.
  6. Stir in the parmesan cheese and season to taste, if needed.


Monday, January 18, 2021

5 Tips for the Best homemade Hummus


Having a hard time with homemade hummus? You are definitely not alone! I have tried and failed many hummus recipes in my day until I finally got into my hummus groove. Below are the top 5 tips for making spectacular homemade hummus that you will be proud of!


Tips for the best homemade hummus with canned chickpeas

  1. Combine the garlic with lemon juice first because this helps to soften the sharp flavor of the garlic.
  2. Blend the tahini with the garlic and lemon juice before adding chickpeas. I swear this helps make the hummus so much smoother!
  3. Another tip for smoother hummus is to actually boil your canned chickpeas (rinse and drain them first) in water for 10-30 minutes. This helps to soften them so that they blend up way easier.
  4. For the creamiest, smoothest hummus of your life, remove the skins on the chickpeas. I know, I know – it’s crazy tedious so I often skip this step, but when I invest the time to do it, it’s always worth it.
  5. Don’t use olive oil to thin out your hummus – I find this weighs it down. Instead I add about 3-4 tbsp of olive oil per 2 cups of cooked chickpeas and good old water to thin it out.

 The recipe is from https://chelseashealthykitchen.com


Homemade Hummus with Canned Chickpeas


Prep time
Total time
 
Author:
Yield: 2 cups
 
Ingredients
  • ⅓ cup lemon juice (from about 2 lemons)
  • 2 small cloves garlic
  • ¼ cup tahini
  • 19-oz can (about 2 cups) chickpeas, rinsed and drained*
  • 4 tbsp extra virgin olive oil
  • ¼ cup water, or more to thin
  • ½ tsp kosher salt
Instructions
  1. Combine the lemon juice and garlic in the bowl of your food processor and let sit for a few minutes.
  2. Add the tahini and process until the mixture is smooth.
  3. Add the chickpeas and run the food processor as you drizzle in the olive oil. Scrape down the sides of the food processor and then run it while adding the water until it reaches your desired consistency.
  4. Season to taste with salt.


Follow The Master Vegan For More Great Vegan Recipes:


Monday, December 21, 2020

How to Make Vegan Energy Balls


Vegan Energy Balls


Date Energy Balls (Vegan, Paleo)


Health Benefits of Walnuts & Dates


You can use any nut or seed combination you like in this type of snack, but I chose walnuts because of their high omega-3 fatty acid content, as well as their antioxidant and phytosterol content, which have been linked to a lower risk of breast cancer. (source)


To make these healthy date balls, all you need is a food processor and 5 ingredients. You’ll process the walnuts and shredded coconut in a food processor until crumbly, then add the dates, salt, and vanilla and process again. 


Course: Snack

Cuisine: American
Keyword: dates, snack
Prep Time: 15 minutes
Total Time: 15 minutes
Servings: 24
Calories: 123kcal
Author: Megan Gilmore
These DATE ENERGY BALLS are a quick & easy healthy snack. Made with walnuts, coconut, and dates, they remind me of cookie dough!  

Ingredients

  • 2 cups walnuts , or other nut/seed of choice
  • 1 cup shredded unsweetened coconut
  • 2 cups soft Medjool dates , pitted
  • 1/2 teaspoon sea salt
  • 1 teaspoon vanilla extract


Instructions

  • In a large food processor fitted with an "S" blade, process the walnuts and coconut until crumbly.
  • Add in the dates, vanilla and sea salt and process again until a sticky, uniform batter is formed. (You can add a tablespoon of coconut oil, only if needed to help the mixture come together.) You don't want to over process, or the batter will become oily, so process until crumbly, but sticky when pressed between your fingers.
  • Scoop the dough by heaping tablespoons, then roll between your hands to form balls. Arrange them on a baking sheet lined with parchment paper, then place in the fridge or freezer to set for at least 30 minutes before serving. Store the balls in a sealed container in the fridge for up to a week, or in the freezer for an even longer shelf life. (I prefer them frozen, myself!)  
     

    Nutrition


Calories: 123kcal | Carbohydrates: 11g | Protein: 1g | Fat: 8g | Saturated Fat: 2g | Sodium: 50mg | Potassium: 149mg | Fiber: 2g | Sugar: 8g | Vitamin A: 20IU | Vitamin C: 0.2mg | Calcium: 18mg | Iron: 0.5mg

Full article at: detoxinista.com


Vegan Carrot Cake Energy Balls 


Prep: 5 minutes
Cook: 10 minutes
Total: 15 minutes
Servings: 25 bites
 
Sweet + chewy vegan energy balls filled with your favorite carrot cake flavors - cinnamon, raisins, pecans, coconut, and carrots (duh!). The perfect healthy snacking or dessert bite that takes minimal ingredients and less than 15 minutes to whip up in your food processor.


Ingredients


Vegan Carrot Cake Energy Balls


  • 1/2 cup pitted deglet or medjool dates (soak in hot water for 10 minutes if dried out)
  • 1/2 cup black raisins
  • 1/2 cup cashew butter
  • 1.5 tsp vanilla extract
  • 2 cups almond flour
  • 1 tsp ground cinnamon
  • 1 ea. large carrot shredded (heaping 1/3 cup, packed)
  • 1/2 cup toasted coconut flakes
  • 1/2 cup pecans roasted


optional

  •  
  • 1/3 cup finely shredded coconut flakes for rolling balls 


Instructions

  • Blend dates and raisins in food processor until blended.
  • Add cashew butter and vanilla extract. Blend until smooth.
  • Add almond flour and ground cinnamon. Blend until smooth.
  • Add shredded carrots, pecans, and toasted coconut flakes and pulse until pecans are chopped and fully incorporated into mixture.
  • Optional: roll into balls and coat with finely shredded coconut flakes.*


 Full recipe at themindfulhapa.com


Follow The Master Vegan For More Great Vegan Recipes:


Sunday, February 24, 2019

Fresh Ginger Tea Recipe - Nature's Antibiotic

Fresh Ginger Tea Recipe - Nature's Antibiotic


Ginger is an excellent all-natural antibiotic, anti-inflammatory, pain reliever and immune system booster that can be used to treat digestive disorders and has been clinically proven to treat colon and ovarian cancer.


Ginger is an excellent all-natural antibiotic, anti-inflammatory, pain reliever and immune system booster that can be used to treat digestive disorders and has been clinically proven to treat colon and ovarian cancer.


Chocolate Chia Seed Pudding - Vegan, Paleo, Keto, Gluten Free

Super Silky Smooth Chocolate Chia Seed Pudding! Chia Seeds benefits are healthy and can help you lose weight. Chia seeds are packed full of Fiber, Calcium, Iron, Magnesium and Omega 3s - which make Chia seeds the perfect food. 


Silky Chocolate chia pudding recipe - Vegan, Paleo, Keto, Gluten free


Silky Chia pudding:

1 cup chia seeds
1/4 cup cacao powdered
1 can lite organic coconut milk
maple syrup for optional sweetener


The secret Chia seed recipe to making easy, smooth & silky Chia seed puddings! You can add fruit, spices to the chia seed pudding and you will find that chia seeds are full of fiber and help you lose weight.

Chia Seeds have been proven to regulate and decrease abnormally high levels of insulin in the blood. They can also reduce insulin resistance to help you lose weight and control diabetes.

A recent UK study showed that chia seeds can lower triglycerides and cholesterol levels while increasing HDL (The Good) cholesterol. The study also found that when substituting chia seeds for other fat sources, the chia seed diet was able to prevent high triglyceride levels and reduce obesity.


Chia Seeds Benefits - Chia is high in both soluble and insoluble fiber, containing 10 grams of fiber, or an incredible 40% of your daily dietary fiber needs from chia seed! Chia seeds will fill you up and help you lose weight by fooling your stomach into thinking it is full and suppressing your appetite Chia contains 179 mg of plant-based Calcium or 17% of your daily requirement. Chia fat is 20% ALA, the highest amount found in any plant. ALA is essential for brain function and hair and nail growth. Chia is 17% protein. Who says you can't get protein from plants? Chia is very high in antioxidants and has four times more ORAC value than blueberries (Oxygen radical absorbency capacity ) Chia contains almost 60% of your daily vitamin B1 and B3 requirements Chia has an incredible 60% of your daily Iron requirements